Friday, December 30, 2011

Another Exploring Cricut Project

This week you have seen a lot of projects from me, but glad to fill in. Today I have made a birthday card that can be used for a man using the cartridges Billionaire Lite and 3 Birds Life's a Party. Below the card are my directions and materials used.
Materials

Pattern paper from Paper Loft
Cardstock from Bazzill and American Crafts
Clock sticker from a Jolees pack
Computer generated saying
Billionaire
Watch cut @ 3 inches
3 Birds Life's a Party
Happy Birthday cut @ 1.5 inches

Thursday, December 29, 2011

Thursday Post at Exploring Cricut

Hello everyone and I am filling in again for one of the DT members at Exploring Cricut for our daily project. I created a scrapbook page using the cartridges Preserves and From My Kitchen. I was lucky enough to have both of my granddaughters to bake cookies with me before Christmas. I was hoping to get another page with my other granddaughter completed for this post, but did not get finished. Below the picture is the directions and materials I used. I am also entering this into a challenge at Heart to Heart challenges.
Materials:
Paper and cardstock from Close to My Heart

Preserves- Title cut at 1.25 inches
From My Kitchen-oven mitts cut @ 2 inches
Apron cut @ 3.5 inches
Utensils cut @ 2 inches

Wednesday, December 28, 2011

Wednesday Daily Project

Today I am filling in for one of the design team members at Exploring Cricut and it is also my birthday today so I am happy to share my project with you! I created a two page layout using the cartridges Winter Frolic, Accent Essentials, Christmas, Graphically Speaking, and George. Below the picture are the directions and measurements of my page. Paper-Bo Bunny and Bazzill cardstock
Title-Winter Frolic cut @3.5 inches
Snowflakes-Christmas cut @ 1.5 inches, 3 inches, and 4.5 inches
Accents Essential cut @1.75 inches
Graphically Speaking cut @ 1.5 inches
Circles-George cut @ 1.75 inches and 2.5 inches
Used Martha Stewart punches
Colorbox chalk
Stickles
Kaiser Crafts Pearls
Making Memories snowflake brads

Saturday, December 24, 2011

Merry Christmas

I would like to take this time to wish all my crafty friends a very Merry Christmas and a very good New Year. My all of you be surrounded with friends and family turning this wonderous time of year.


Tuesday, December 20, 2011

Tuesday Project at Exploring Cricut

Hello and welcome to another daily project that I am lucky enough to display at Exploring Cricut blog. I decided to make my own tags again this year and used a few different cartridges to create them. I used Christmas Cheer, Simply Charmed, Jubilee, and Winter Frolic. Below the picture is the directions for these tags. Be sure to join the challenge this week at Exploring Cricut too!
Directions
Christmas Cheer-stocking cut at 5.5 inches

Simply Charmed-mitten and snowflake cut at 5 inches

Jubilee-holly cut at 1.5 inches

Winter Frolic-ornament and snowman cut at 5 inches

I just used ribbon and scraps from my stash. I also stamped snowflakes with faces from PeachyKeen stamps


Monday, December 19, 2011

Exploring Cricut Challenge #6

This is our last challenge of 2011 at Exploring Cricut and it is to make a card, layout , or papercraft using a pine, fir, evergreen or Christmas tree in any colors or themes you would like! I hope you will all join us in this last challenge. It is a easy one and crafting will help you destress in this stressful time of the last few days before Christmas. Below the pictures are my directions and materials for this page. I used the cartridges Christmas Noel and Teresa Collins Holly Digital. Merry Christmas from Happyscrapperdiane!


Directions:

Christmas Noel cartridge


Tree cut @ 8 inches


Teresa Collins Holly Digital


Title cut @ 4.5 inches

Holly cut @ 10.667 inches in craft room all layers the same


I used Close to My Heart Mistletoe Collection pattern paper and cardstock

Liquid Applique

Red Stickles


Friday, December 16, 2011

Papercutz Challenge

This weeks challenge at Papercutz is "All Hearts Come Home for Christmas". Make a card, layout or papercraft using hearts and use any colors you would like. I decided on a card and I used the hearts from George Basic Shapes. I cut 3 hearts at 1.5 inches and 1 heart at 1.25 inch. I inked the edges with white and positioned them into a Christmas Tree. I used some Queen and Co jewels to adorn it. I also used Bazzill cardstock and I embossed the white with my Cuttlebug. Fast and easy card! Please join us this week with your creation.


Sunday, December 11, 2011

A new guy in my life!

His name is Ozzy and weighs a whopping 1.6lbs. He is the cutest little fuzzy ball, but he is almost as bad as a new baby. Now if there was a way to get him trained fast it would help!


Wednesday, December 7, 2011

Wednesday's Exploring Cricut Post

Today I am helping out one of our Exploring Cricut design team members who is not feeling so well . I created a scrapbook page using the cartridges Holiday Cakes , Stretch Your Imagination, and George Basic Shapes. I have recently purchased the cake machine and tried it out once, but love the cake cartridges for all the wonderful designs it has. Below the picture is the directions for this project. Be sure to stop by Exploring Cricut tomorrow for another daily project and be sure to enter our challenge this week too!
Holiday Cakes
Wreaths cut @ 5.50 inches
Title cut @ 3.50 inches

Stretch Your Imagination
Holly cut @ 1.5 inches and 2.00 inches

George Basic Shapes
circles cut @ 5.50 inches

paper was from paper pack of Martha Stewart (last year, not sure name)
Bazzill cardstock
Chestnut roan ink
white uniball pen

Tuesday, December 6, 2011

Tuesday's Daily Project at Exploring Cricut

Today I have the daily project over at our blog Exploring Cricut. I made a two page layout using the cartridges Jolly Holidays, Wild Card, and Storybook. Below the picture is the directions. Be sure to stop by Exploring Cricut every day for a new project.
Jolly Holidays
Elf cut at 4 inches and 4.75 inches
Package cut at 2 inches
Santa cut at 5.5 inches

Wildcard
title cut at 6.5 inches

Storybook
date cut at 1.5 inches

Paper-Kaiser Crafts Countdown collection
Bazzill cardstock


Monday, December 5, 2011

Exploring Cricut Challenge

Today is a new challenge at Exploring Cricut and the challenge is to make a card, layout, or papercraft using a sled or sleigh from any cricut cartridge! This is really a fun challenge and the DT did a fabulous job with their creations! I decided to make the sleigh from Winter Woodlands and turn into a display piece. Below the pictures are my directions. Can't wait to see what you create for this challenge!


Direction:


Sled cut at 6 inches (2) one in reverse


I cut it out of heavy cardstock and also cut chipboard to make it more stable. I made a box just by cutting pieces of cardstock and folding them into a box shape for the inside. No special measurements, just to the size you need.


Packages were cut from Art Philosophy


one cut @ 4.50 page 22


one cut @6.25 page 21

Tags, Bags, Boxes and More
one cut @ 8.00 page 119

Bows cut from 3 D Bows Digital @ 2 inches and 6 inches

Materials used:
American Crafts Silver Cardstock
Basic Grey Eskimo Kisses Pattern Paper
Bazzill Cardstock
Ribbons and Brads

Friday, December 2, 2011

Paper Cutz Challenge

This weeks challenge is called Jingle all the Way! You are to make a card, layout or craft project using a stamped, digital, or Cricut cut of a image of Jingle Bells. I decided on a card using the Joys of the Season Cartridge of the Bell on page57 cut at 2.5 inches. I made the card using the ornament card cut at 5 inches. The holly was cut at 1.25 inches and was from the cartridge Stretch Your Imagination and Joy was cut at 1 inch and was from Winter Woodland. Let us see what you can create with this challenge. Post your project at the PaperCutz blog.


Tuesday, November 22, 2011

Tuesday's Daily Project at Exploring Cricut

I have the project today over at Exploring Cricut and I made a couple of gift boxes and the bows for them. I used the new digital cartridge 3D Bows and Art Philosophy Close to my Heart cartridge. I created the bow in the Cricut Craft Room. I will be glad when my digital images I purchase go to the Gypsy because I like using it better, but am giving the Craft Room a chance!
These boxes are perfect for small gifts. Below is the directions and measurements I used. I will say the bow on the smaller package needs to be cut bigger because it was a little harder to do, but you are seeing my first two bows using the digital images. Be sure to join our challenge this week too!


This is the smaller of the two boxes and I cut it at 9 inches from page 22 using the font layer shift key of Art Philosophy . The bow was done in CCR measurements 4 x 4.11 inches. in

3D Bows digital images. I used some paper from Fancy Pants and cardstock for package and bow.


This box is larger and will hold a scarf or some candy. Nice size really. It is cut at fit to page which was 10.5 inches. I used the Art Philosophy cartridge page 28 font layer shift key. The bow was done in CCR and was cut width 10 inches height 5 inches. with the 3D Bows digital cartridge. This one was much easier to do.


Monday, November 21, 2011

It's a new challenge at Exploring Cricut!

We have a new challenge at Exploring Cricut and we would love for you to join us! The challenge is to create a card, layout, or papercraft using a Turkey image from any Cricut cartridge in any color or theme! I created a 2 page layout using the Thanksgiving cartridge. I cut the title at 4 inches, turkey at 4.5 inches and the leaves at 1.5 and 2.25 inches. I used bazzill cardstock and a piece of paper from my stash. Let us see your creations and a chance to win a prize!

Friday, November 18, 2011

Friday Daily Project Exploring Cricut

This is my project for the Friday Daily Project at Exploring Cricut. I made a layout to use during the holidays using the cartridges Winter Woodland and Jubilee. Below the picture are the directions and supplies I used for this layout.
paper-Recollections Music paper inked with Antique Linen by Tim Holtz
Tree Lot by Paper Loft
Quilted by Bo Bunny

Title -Joy cut @ 2.5 inches Winter Woodland
Poinsettias cut @ 2.5 and 4.5 inches Winter Woodland
Holly cut @ 1.75 inches Jubilee

Papercutz Challenge

It's time for another challenge at PaperCutz. This challenge is called, "Let's Talk Turkey". You are to make a card, layout, or papercraft using a stamped, digital, or Cricut cut image of a turkey. Use any colors you like. I decided on making a wreath with my turkey. I used the cartridges Paper Dolls Dressup and Simply Charmed for my project. Below are directions. Hope you enjoy and stop over and check out the other DT members projects.
Directions:
I used assorted patterns of Fall papers from a DCWV stack that I had along with cardstock scraps. This was made of entirely scraps from my stash.

Pinwheels-cut strips from 1 to 3 inches, scored and put together in circle. I used hot glue to secure them.

Turkey cut @ 8 inches-Simply Charmed
Leaves -cut @ 2 inches-Paper Dolls Dressup
Happy Thanksgiving-cut @ 3.25 inches-Simply Charmed

Tuesday, November 15, 2011

Nothing to share but....

I am working on several projects I will be sharing in the next few days. I have been trying to create in the new Cricut Craftroom. I have been playing and I have to say, I am still not a fan! I loved DS and I love the Gypsy, but not this yet. I do like the fact that you can get a few digital images even though I think they are a little pricy and they are suppose to link to your Gypsy. I did watch the HSN premiere of the Cricut Mini, but not something I am jumping on. How many machines does one person need??? I will just spend my money on cartridges. I did get the cake machine cheap and it arrived yesterday. I used some of those Wilton sheets to cut with and they worked, but not a fan of those. I am still undecided whether I made a mistake or not, but either way the Cake Boss and Duff have no worries about me taking over their cake business any time soon. I can always add the deep cut blade and use as a cricut if one bites the dust! Hope you are having a good week, too much rain here for me!

Wednesday, November 9, 2011

My Scrap Space

I have had a few people ask me about my scraproom so I thought I would make it at least presentable and take a few pictures of where I do my thing! I live in a old house so not many electrical outlets but lots of power strips going on in here. My husband says he is worried everyday he comes home that one of the walls have caved in. There is no free space in this room and it is not small, it is a 13 x 19 room, but full. One of these days we will finally sell and I am getting a house where my dream room will be or we will build it ourselves! Here is a little tour of where I work!
This is a 8 foot counter and cabinets I got at Lowes. As you see there is no space not used. I have two cabinets on the wall for stamp pads, flowers etc. and a small one for embossing and glitter powders along with a stickles rack. I had that in my store I closed.


Another look at that space. I also do my major cutting there too.

Since I do not waste space, I had my husband fix the space between the cabinets for storage of my clear stamps and a few accessories. We still have to buy the roller bars so it will pull out and I need to paint them, but I already have it stuffed!

This is a 6 foot counter area where I have my cuttlebug and spellbinder dies along with my laptop and picture boxes I am currently working on. You can see my wood stamps in the background.

This is my wood stamps that are not sets. My husband built these for me and I have several hundred wood stamps and the shelves are full!
Being an old house, this was a door that went between bedrooms. When we remodeled the main bedroom, we build a wall where the door was and on this side we built shelves that house my cricut cartridges. Not sure what I am going to do when this is full, not much room left!

Another view and the door you enter where I store my punches. I am cheap so I bought curtain rods to hold them and I also have a basket of ones that will not fit. Beside the cricut cartridges is a small shelf that holds my cartridges like seasonals and solutions that I have in boxes from scraponizer, but need to paint shelf.

Another look at my punch storage. I tried shoe bag, but was not enough space.
My cardstock rack. It came from Bazzill and I had it in my store. It was a job getting my husband to agree to move it, but he quickly gave in! I do have my ways to do that lol. I also have several of the cubes from Michaels on the side of it too.
Another thing in an old house, no closets. This room had a press. They were not very deep and you had to push stuff in and press the door shut! We took the door off, and put a book case in it and secured it to the back wall. Then we added moulding around and looks like a built in which I have completely full!
Another view of the paper storage.
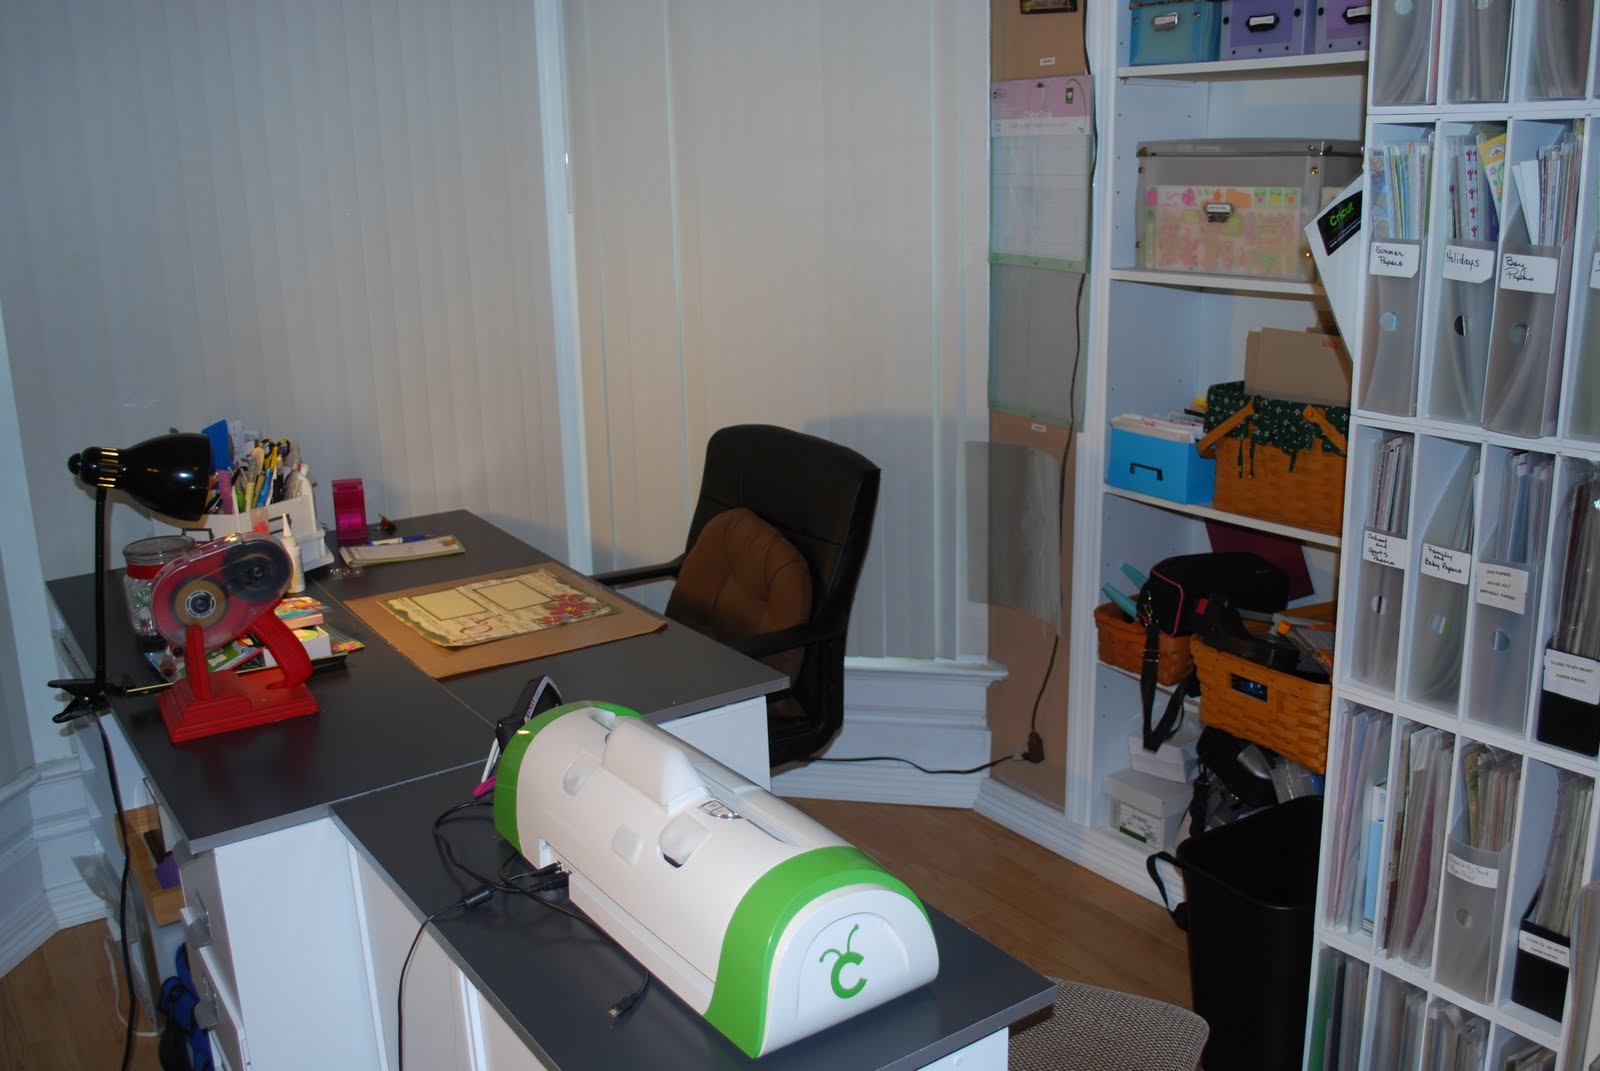
This is where I work. I made a desk from 8 cubes from Michaels and we went to lowes and found two tops and put them together. I also made another small desk from 4 cubes and another top to put my cricut on.
Another view of the desk area and cricut station.
My decorated Cricut. I did not want to do anything over the top, but wanted to personalize it a little bit! Now you have seen where I work. I need more space!!!!!

Tuesday, November 8, 2011

Tuesday Daily Project at Exploring Cricut

Today is my day to do the daily project and I made thank you cards to send to the winners of our challenges along with their prize. I love the bug head and thought this was a perfect way to thank our winners. Little cricut got into the picture too! Be sure to stop by Exploring Cricut daily to see our projects. You have this week to enter our challenge too! Below is the directions for this card and I used the cartridge Storefront.
I cut the layer and the top bug head at 3.5 inches
Paper is plaid from Recollections
Cardstock is from Recollections.
I used stamps from Close to My Heart and Hero Arts
Card bases are 4 1/4 x 5 1/2

Monday, November 7, 2011

New challenge at Exploring Cricut

Our challenge this time is to use acorns and leaves from any cartridge you want! I used a few cartridges for my scrapbook page. The ones I used were B is for Boy, Art Philosophy, Mickey and Friends and Designer Calendar. Below the picture is the directions. Please join us this week in the challenge!


Paper- Close to my Heart Felicity

cardstock-Close to my Heart

acorn-B is for Boy cut @ 1.25 and 2 inches

leaves-Art Philosophy cut @ 1.25 and 2 inches

leaves- Designer Calendar-cut @1.35

leaf-Mickey and Friends cut @1.50 inch

Friday, November 4, 2011

Great challenge at Papercutz this week!

This week at Papercutz the challenge is called "Gobble Gobble" and you are to make a card, layout, or papercraft incorporating a recipe for one of your favorite Thanksgiving dishes. I decided to make a recipe board. I love thrift stores so I found this frame and told my husband to get me a piece of tin cut to fit. I painted the frame black and the tin white. I made the magnets from cricut and copied my favorite recipe on a card. Below are pictures and the directions along with this yummy recipe for Pumpkin Roll Cupcakes. Please be sure to sign up for my email updates on the side of this blog.


This is the finished project of my recipe and these are so good too and easier than pumpkin roll.


I found this cupcake pan from Debbie Meyer that has this thing that makes the holes in the cupcake while it bakes. Makes it so easy to fill!


I used the cartridges From My Kitchen


recipes cut @2.50 x 5.25 out of vinyl


pie cut @3.5


rolling pin cut @ 4.75


cupcake cut @ 3.25


cake cut @ 2.75


From the cartridge Preserves


cherry cut @ 2.75


I used bazzill cardstock and put a magnet on the back


Recipe for Pumpkin Roll Cupcakes


4 eggs 1 2/3 cup sugar


1 c. oil 15 oz can pumpkin


2 c. flour 2 tsp. baking powder


2 tsp cinnamon 1 tsp salt


1 tsp baking soda


Preheat oven 350. Mix eggs, sugar, oil, and pumpkin, beat till fluffy. In another bowl, mix flour,


baking powder, salt,cinnamon and soda. Add dry ingredients to pumpkin mixture. Bake 20 minutes till done. Makes 24 cupcakes.


Frosting


4 oz cream cheese softened


1 stick butter softened


2 cups powdered sugar


1 tsp vanilla


Mix together till smooth, fill holes in center of cupcakes when cool and add frosting to top.


Note** sometimes I make batch and half of frosting because I like it stuffed!


Wednesday, November 2, 2011

The fastest project I ever made!

My granddaughter Katie age 8 years old went to see Taylor Swift in concert Saturday night and they took some pictures. I got them late on Sunday so spent Monday putting her a little book together to take to her on Tuesday. I used the cartridges Quarter Note and Hannah Montana. I did the book from Bind It All and I modge podge the cover since it would be handled quite a bit with her enjoying the pictures from her concert evening. She really liked this book even though her Nana put it together quickly!!